My mom's tupperware mat and rolling pin circa 1960!
Among my many adventures in crafting and all things artsy, I have decided to try my hand at cake decorating. Understand, I am a complete amatuer, but I would like to share what I have learned. Also, I love to save money and I spent about $10.00 on this cake versus the $75.00 the bakery wanted for a similiar cake.
Here goes, first assemble cake layers. Last year I made a vanilla bean genoise cake, with layers of swiss buttercream, interlayered with a chocolate ganache. My kids hated it, this year betty crocker boxed mix was my friend, and my children ate it with relish. Whatever, at least I saved hours of time even if my ego is a bit bruised.
I used three different size pans, a 9 inch, 8 inch, and 6 inch pan. After baking I trimmed the top off the domed top, so that each layer will sit even. I used ready made frosting and used two and half cans of frosting, and two boxes of cake mix for this cake. Wilton also sells a special pan for doll cakes, but I think this is just as easy plus I saved money. Let cakes cool well before decorating.
After layering the cake, I trimmed the sides to give a more rounded appearance, then I frosted the cake, first a crumb coat. Don't worry if it looks messy, fondant will cover everything up. Then I let the cake rest for a while in the fridge. After about 30 minutes, I refrosted her, to give her a smoother layer. Any dents or grooves should be filled with frosting.
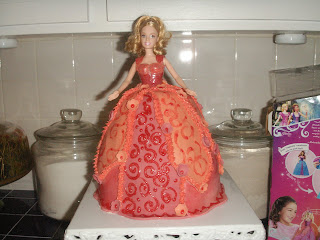
Carve a hole in the center of the layered cake. I did this by inserting a knife into the center and making a circle, then using a long spoon to eat the inside of the cake -YuMmmm. My daughter wanted Barbie and the Diamond Castle to be her theme. After buying the doll, I realized the gown doesn't come off so I used an inexpensive Barbie and made the bodice of her gown out of fondant. Wrap the Barbie doll in plastic wrap to keep her legs from getting too dirty, or simply buy one the Wilton doll picks, but their faces aren't as pretty as the Barbie. Insert her into the cake.
Next, for the fondant. I purchase the premixed fondant, but there are recipes for it on the web. They intimidate me, so I go to Walmart and buy the white fondant. If you want to add color, I suggest the gel food color, liquid would change the consistentsy of the fondant. Use a small amount of gel color ( you can always add, but can't take away), and start neading it like dough. You can use cornstarch or powdered sugar to dust the rolling pin and board. I like cornstarch better, sugar gets too sticky. After the fondant is well kneaded and color is exactly the way you like it, begin rolling it, to about 1/8 inch. Usually, cakes are covered entirely with fondant, smoothed out, and trimmed. This time I wanted the gown to be layered so I sectioned the fondant the same way you would piece together a dress. The fondant sticks to the frosting, and smooth is down with her fingers and palm of your hand.
I also cut out small flower shapes to add as decoration which I attatched with the frosting. Royal icing would work best, but I didn't feel like making it, so frosting it is. I colored more frosting to fill in any gaps and hide any mistakes in the fondant. I used a small star tip on my icing bag, but a baggie works just as well. I then used a sparkle gel tube, ready made, to make the designs on her gown. This took about 3 hours from beginning to end. The birthday girl was very happy, just look at her face.


No comments:
Post a Comment